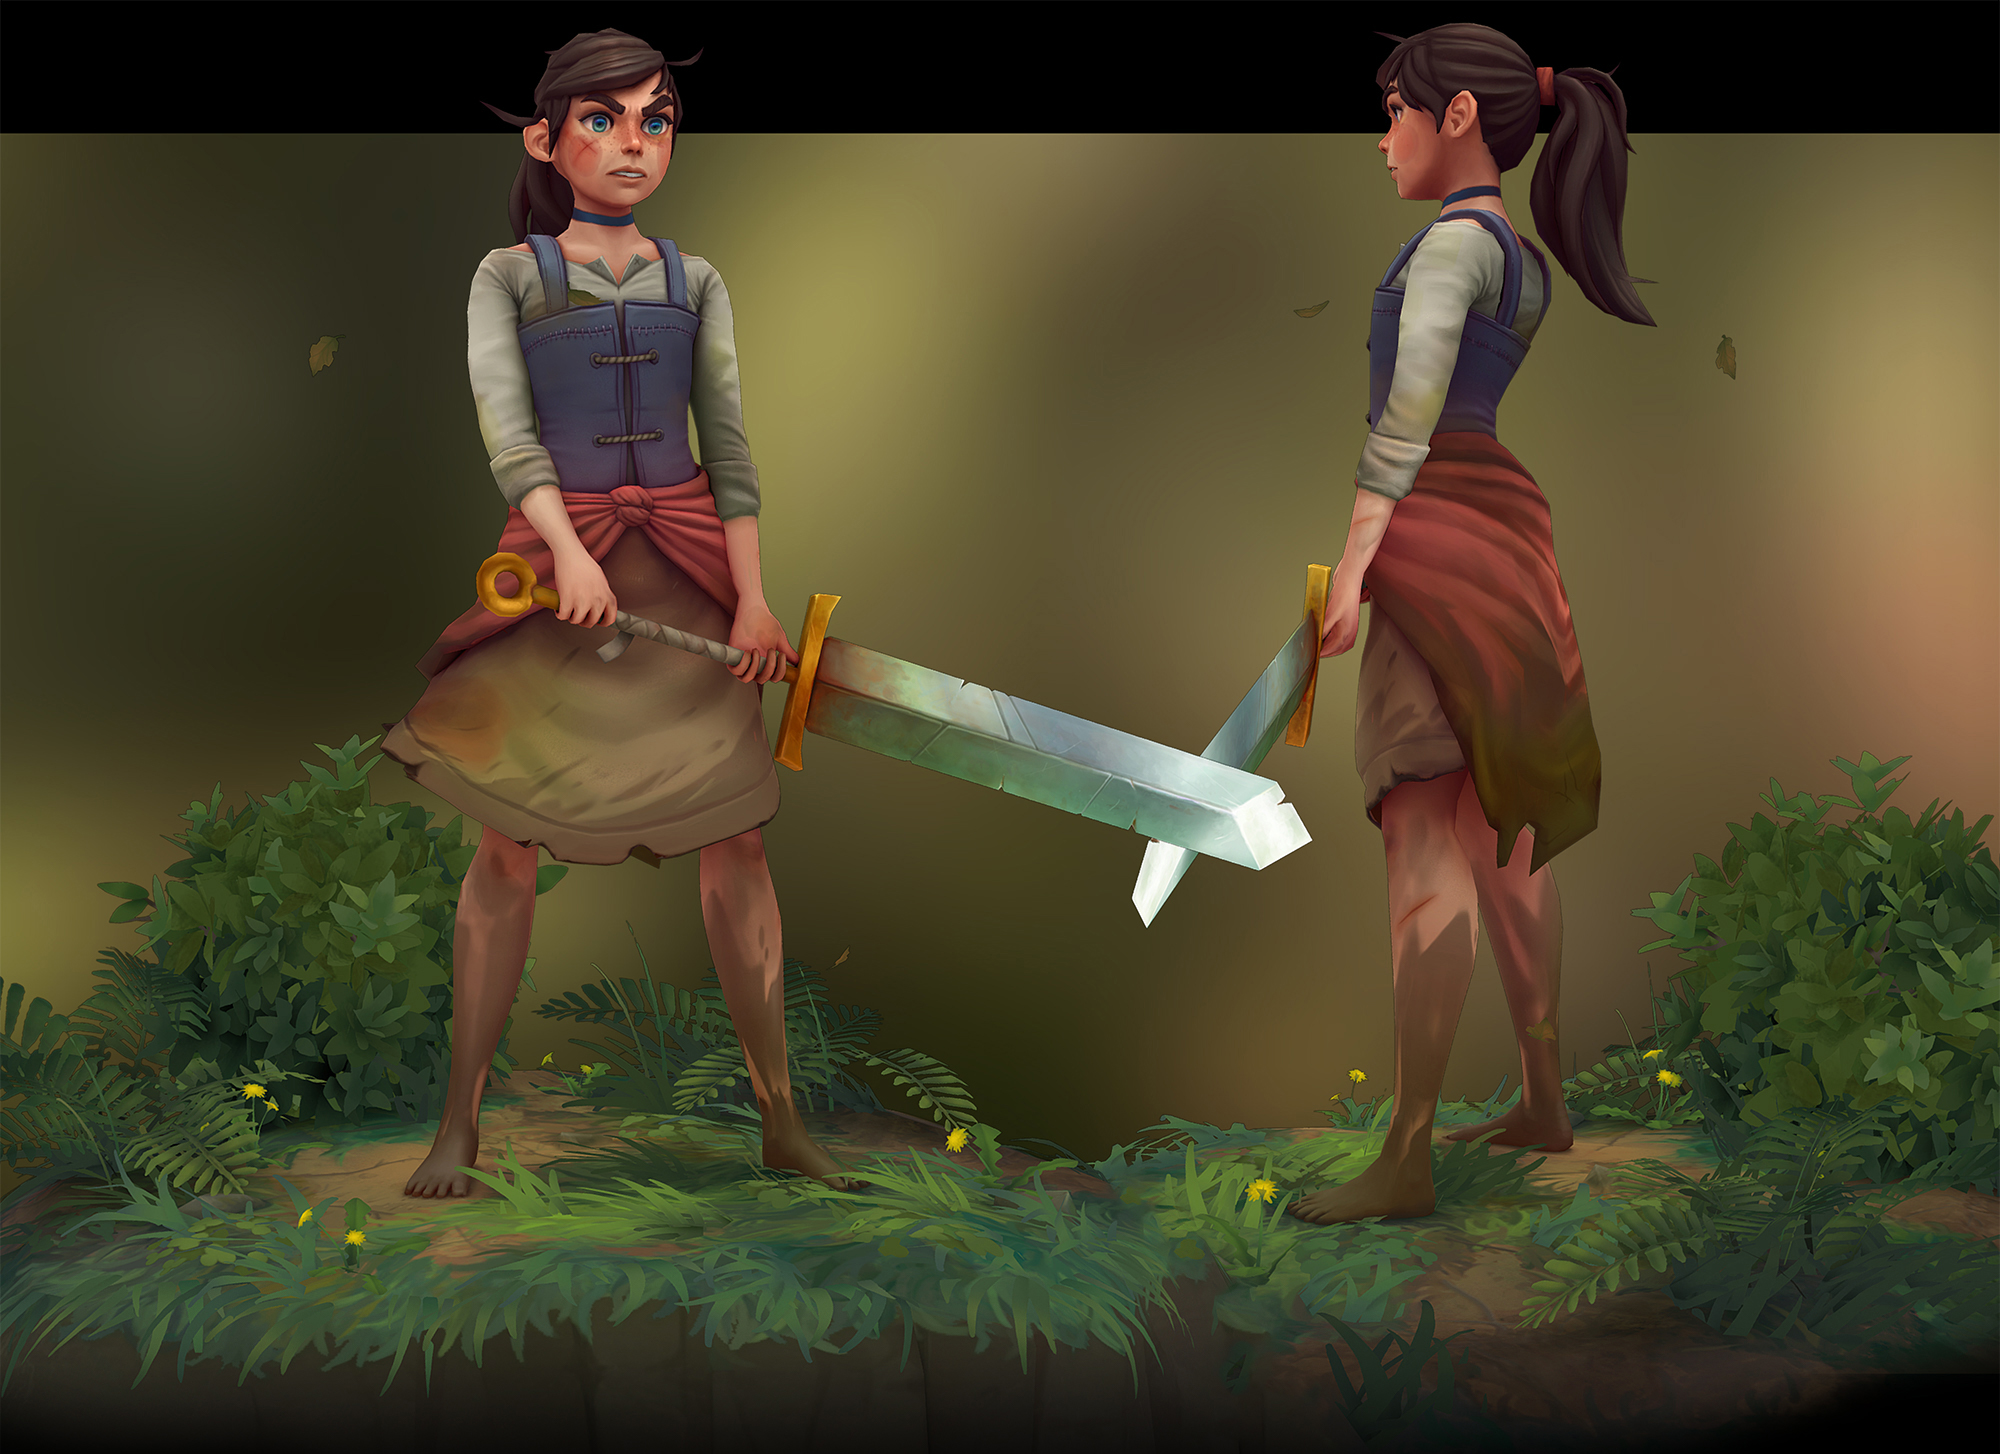
Manuel Sitompul shared the breakdown of a stylized character based on Jake Wyatt‘s comics: sculpting the body, modeling clothes, retopo, and texturing.
Introduction
Hey! I’m Manuel Sitompul, a 21-year-old game art student living in the Netherlands.
Games have always been a big interest for me. As a child, I spent the majority of my time exploring the story and worlds of Zelda, Pokémon, and Rayman. I got so immersed in these worlds that I decided to start making my own by playing with Game Maker and learning GML.
However, my first real game art experience started when I decided to study Visual Art at Breda University of Applied Sciences.
Throughout school, I worked on many projects and learned about many different sides of game art such as procedural modeling, 3D animation, standard asset creation, and engine implementation. Experiencing this provided me with a good base to start making my own projects.
Draw Your Weapons

Motivation
The journey started when I participated in a competition hosted by Yekaterina Bourykina. The challenge was to create a hand-painted character bust, with the prize being a mentorship. I ended up winning the competition and gaining tons of experience in hand-painting!
The 3D character bust I started my hand-painting journey with:

Thoughts & Goals
After the 3D bust was received so well, I wanted to set the bar higher and create a full character. I’m a big fan of Jake Wyatt and his Necropolis comic, so I decided to create the protagonist from the comic.
The biggest thing I wanted to nail in this project was the emotion. The girl is an incredibly ferocious character filled with rage, which she eventually demonstrates by slaughtering a bunch of bad guys. Those kinds of emotions aren’t easy to translate into a 3D model, but I took it as a challenge.
The reference board for Jake Wyatt’s character from Necropolis:

Sculpting the Character
I started the character by creating a blockout in ZBrush. Creating quick blobs in the shape of a human allowed me to establish the anatomy and style pretty quickly.
Basic blockout I made in ZBrush:
I continued by Dynameshing the blockout and refining the basic shapes of the body. Adding muscular detail wasn’t a priority because it was not yet determined where the clothing pieces would cover up the body. Additionally, using a hand-painted workflow allowed me to work less detailed because the sculpt would only be used for a diffuse bake, which I could simply paint over.
Dynameshing and smoothing the blockout to create a simple mannequin:

While sculpting the face, it was very helpful to have some additional features in place, such as eyebrows, eyelashes, and hair. For the hair, I used a haircurves brush, edited by Chris Whitaker and called makkon_haircurves_03. The eyelashes and other pieces of special geometry were simply modeled in Maya and put in ZBrush. I advise anyone who is new to sculpting: if there’s any task that seems easier in your preferred modeling software, it’s probably worth it.
Using makkon_haircurves_03 to create the hair strands and modeling the eyelashes in Maya:
The girl from the comic has very dynamic and wrinkled clothing, so it took me some experimentation to figure out how to approach this problem. I started by creating a simple dress in Marvelous Designer, which allows me to create realistic creases in the clothing.
Experimenting in Marvelous Designer to create clothing:

In the end, I decided to manually sculpt all the clothing except the skirt. In this case, I liked the amount of control I had by sculpting the folds by hand. Even though it isn’t as realistic as a Marvelous Designer simulation, I could get away with it because of the hand-painted nature of the project.
Using ZBrush to create the clothes was incredibly easy, I simply took the base body, masked it, and used Subtool > Extract with a subtle Thickness. I continued by using the Standard brush to paint some folds.
The process of creating clothes:

Various stages I went through while creating the sculpt:


Retopologizing the Character
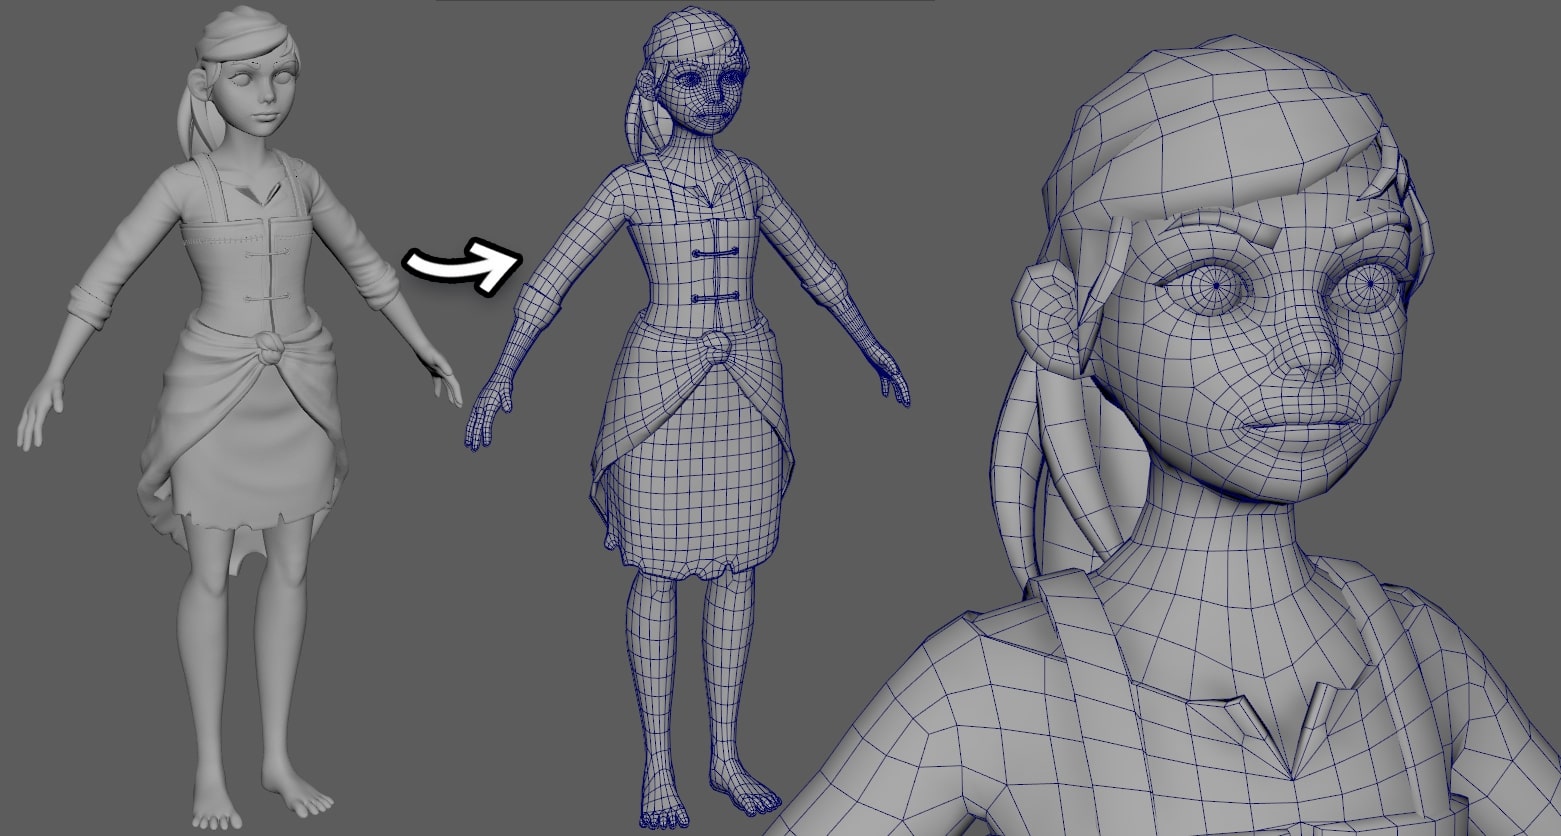
When the sculpt was finished, it was time to create a low-poly version which I could bake the sculpt on. I merged all my subtools with Merge > Merge Visible. Unfortunately, Maya doesn’t like a 12 million poly mesh, so I had to decimate the mesh using Decimation Master to lower the polycount a bit.
When the decimated model was in Maya, I made the object live and used Quad Draw to draw the faces on the mesh. I used this technique to retopologize the entire character. I ended up connecting a lot of the clothing to the skin, which would help me skin the character more easily, and result in fewer artifacts in animation.
The final topology of the character:

Texturing the Character
I started this project to build some experience in hand-painted textures. Just like for my last hand-painted project, I used 3D Coat because of its dynamic link with Photoshop. Not only is this great because painting in Photoshop is so versatile, but 3D Coat also allows me to make projections of the 3D model, which I can paint over in Photoshop.
For this project, I decided on diffuse-only textures, which means the final product will not interact with lighting in any way. This means all the shadows, reflections and highlights must be painted by hand.
To start off, I wanted to create some base colors and basic lighting. I imported my model into Substance Painter and baked the high-poly model on the low-poly. I continued by using an incredible smart-material called SoMuchDiffuse, which took the high-poly sculpted data and baked material information down into a single diffuse texture. Using this tool, I added base colors and gradients for every part of the character.
The base character texture generated with the use of SoMuchDiffuse:

This is where the hand-painting starts. I continued by exporting the new diffuse texture and importing it into 3D Coat. My painting process is very straight-forward: my main focus is always to add more definition and highlight to the areas that I want the viewer to focus on, which is the face in this case. I started by painting lighter values fading from the middle of the face, which gives the face more depth. Additionally, I tried painting a lot of different hues in the face such as reds, greens, and blues. I treat this process no different than painting a character in a 2D illustration.
Using the base made in Substance Painter to hand-paint over in 3D Coat:

The eyes, in particular, were fun to make! The vertex in the center of the eyeball is going inwards to create a parallax effect. Additionally, there’s a separate mesh for the cornea, on which I painted the eyes’ reflection. Because there’s a distance between the reflection and the pupil now, the eyes have much more depth.
The cornea is a separate mesh from the eyeball itself, adding depth to the eye:

I couldn’t call the textures finished until the character was fully rigged and posed. For example, changing the position of the arms can create new shadows and creases which I need to hand-paint. I proceeded to create a basic skeleton for the character and a few bones for the facial expression.
The skeleton of the character:

Settling on a pose and the facial expression took a while. Eventually, I settled on a specific panel from the comic (Chapter 01, page 10), where the girl held a simple but strong pose. When all the posing was done, I could paint the shadows and ambient occlusion, because I finally knew which side of the limbs would face outwards and which parts would collide.
The textures before the posing was done, and the textures after I painted according to the pose:

Environment
I think an important part of selling your character is the presentation. You can spend hundreds of hours on a project, but if you don’t present it right, people will miss out on what you made. For this project, I cared a lot about emotion and immersion in character, so I tried to take that into account when presenting. Adding a simple pedestal wouldn’t be very immersive, so I decided to create a small animated forest environment around the girl.
The process of building the natural environment:

Retrospective
I have never done a hand-painting project of this scale, and it’s safe to say it was quite a challenge. Getting all the materials to feel coherent while keeping the hand-painted details consistent in the character and environment was something that took me a lot of iterations.
However, the biggest challenge was the face. The character is supposed to be an incredibly angry and fierce young woman. Yet at the same time, I needed to sculpt her in a neutral pose so the character could be used in possible future scenes where she is conveying different emotions. In retrospect, I would’ve sculpted the character with an angry expression immediately, so I didn’t have to wait until rigging to get the feeling of the scene. I could always resculpt the face if I need new expressions.

Afterword
If you got this far, thank you for reading! I hope this inspires you to make something new!
You can find me on Artstation and Twitter. Feel free to send me a message if you have any questions!
Manuel Sitompul, General Game Artist
Interview conducted by Kirill Tokarev
http://www.funkybunnies3d.com/tools.php
Chris Whitaker | Character Artist | tools
www.funkybunnies3d.com


'GAME GRAPHIC GUIDE > 참고하기 좋은 작품' 카테고리의 다른 글
| Csaba Baity (0) | 2021.06.29 |
|---|---|
| Zbrush 극사실주의 캐릭터 모델러 Hossein Diba (0) | 2020.02.01 |
| Handpainted Character : Manuel Sitompul (0) | 2019.06.19 |
| B ge - 중국 아티스트/Zbrush/Handpaint/Stylized Artist (1) | 2019.06.19 |
| Handpainted Character Artist : SkyFlakes - LoneDruid (0) | 2019.06.19 |


댓글